Steam Deck SSD installation: How to upgrade your storage drive
Interested in upgrading SSD storage on your Steam Deck? Fret not; We will take you through the entire process of SSD installation on Steam Deck.
The Steam Deck is among the best handhelds and most affordable gaming consoles. The cheapest version of Steam Deck comes with 256GB of internal storage, which isn’t as big a let down as the older 64GB model, but it still leaves much to be desired.
While the handheld now has a 512GB and 1TB storage variant which came along with its OLED upgrade, you might still run out of space quickly because most modern games are storage-hungry. If you want additional storage on your Steam Deck, you can always pop in a microSD card or install a bigger SSD.
Disassembling the Steam Deck is pretty straightforward, and it might take just over an hour to install an SSD, but installing Windows isn’t as simple as you’d think.
You must tread cautiously, and tidying up your desk should be the first step, especially as you do not want to misplace any parts or screws.
We’ve listed our recommendations in case you’re missing any needed items.
Contents
- Everything you need
- How to remove the back
- Removing the Steam Deck’s storage
- Reassembly
- Flashing SteamOS
- How to load the Steam Bootloader
- Reinstalling SteamOS
- Alternative method: Clone the SSD
Everything you need to upgrade your Steam Deck SSD
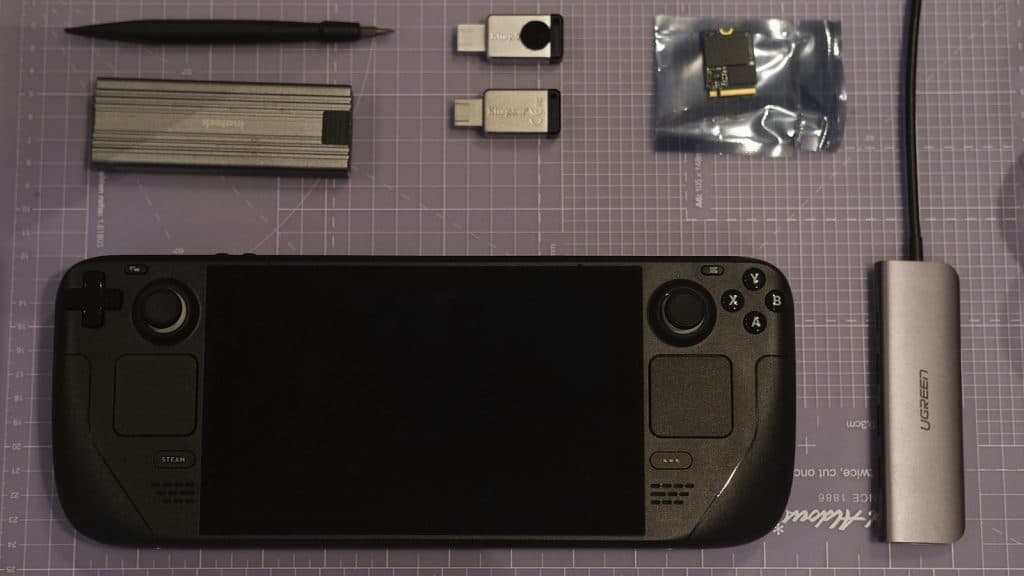
- A USB stick with at least 8GB of storage
- A 2230 NVMe drive
- SteamOS image file
- Rufus and/or balenaEtcher
- Spudger
- A screwdriver
- Phillips head screwdriver
- Size 0 Phillips bit (PH0 or PH00)
- USB-C hub
- Steam Deck charger
The Steam Deck only takes 2230-sized NVMe drives. These are usually found in older MacBooks, Surface laptops, and other smaller devices. They work exactly the same, they’re just about the size of a couple of Iced Gems.
Sabrent, the maker of SSDs and other PC parts, has handily released an easy-to-get 2230 SSD that’s available on Amazon. You can get up to a terabyte for roughly a similar price of those on eBay seen below.
You can grab one from eBay, which is where we got ours
| Drive | Size | Price (subject to change) |
|---|---|---|
| WD SN530 | 1TB | $139.64 |
| WD SN530 | 1TB | $143.68 |
| WD SN530 | 512GB | $79.89 |
| Kioxia (Toshiba) BG4 256GB/512GB | 256GB | $19.99 |
Make sure you power down the Steam Deck completely. We’re going to be disconnecting the battery and touching its insides. The last thing you need to do is fry your Steam Deck, or yourself, because of dangerous acts of stupidity.
Also, remove the SD card if you have one. We don’t want to short it in a freak accident.
Valve recommends you depower it to 25% or below, but unless you’re going to be stabbing the battery with the screwdriver, you should be fine.
If you want to clone your SSD, you should stop now and follow those instructions beforehand. Then you can come here and continue the process.
Remove the back of the Steam Deck
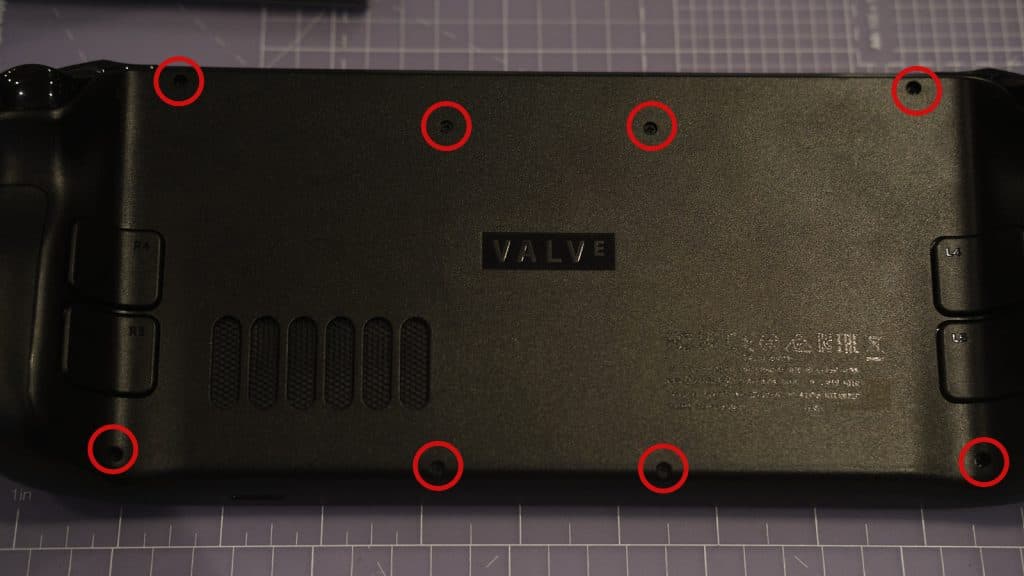
On the back of the Steam Deck is eight screws. Using your Phillips head screwdriver, carefully unscrew and set them aside. The short screws align with the four in the center of the device, while the four longer ones side at the outer edges.
If your screws are ‘stripped’, in that while being produced they lost their grip and the screwdriver isn’t sticking, stop screwing. You’ll make things worse. We wound up using a flathead bit to forcefully begin the process.
Unclip the back of the Steam Deck’s case
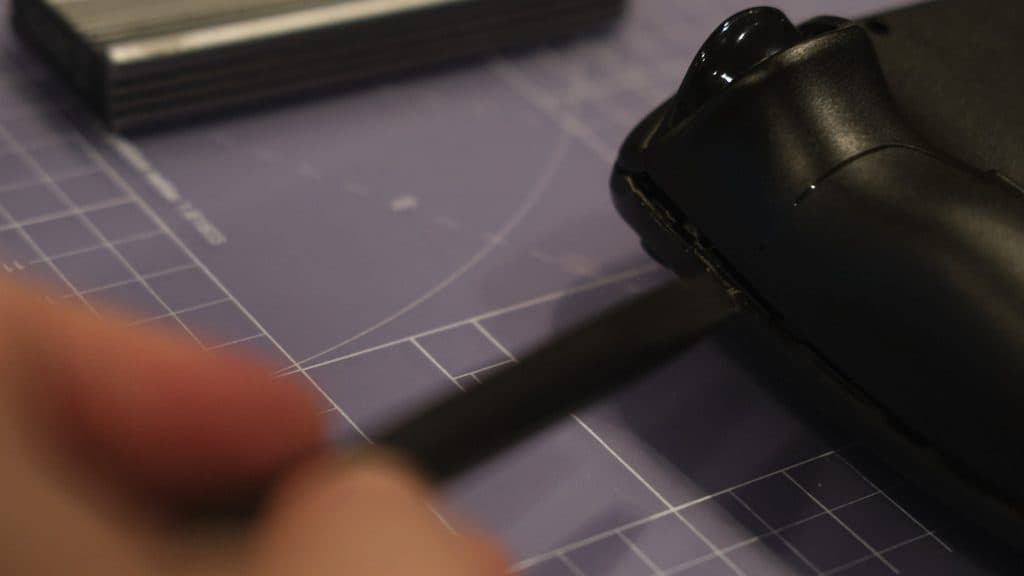
Using a spudger, or another tool (don’t use a screwdriver, you could damage the case), move along the right side of the case from the top to the bottom. The case will eventually come undone and you can take it off with a gentle tug from the gap you’ve made.
Set it aside and stare deep into the vortex of the various bits and bobs.
Removing the Steam Deck storage drive
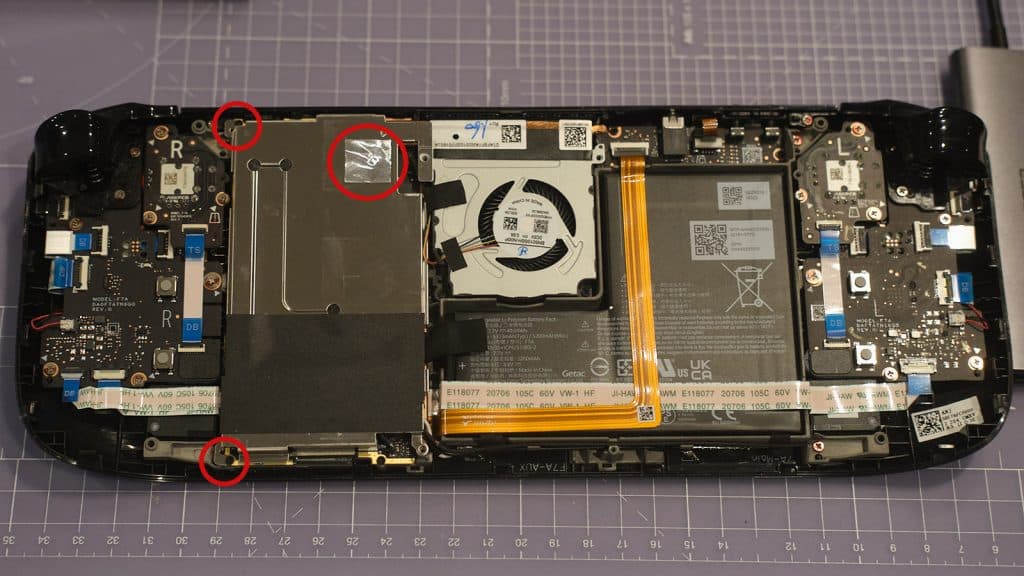
You’ll be immediately greeted with a metal plate. It’s recommended you use tweezers, but as long as you’re careful, you can peel back the metal sticker to reveal the hidden screw.
Again, using the PH0 or 00 bit, remove the hidden screw and two others to loosen the metal plate. You can then place it to the side for reassembly.
Disconnect the battery
Some guides recommend tugging on the cable’s loose material. We decided to disconnect the plastic connector from its sheath first. Once disconnected, you can push back the connector until we need to reinsert it.
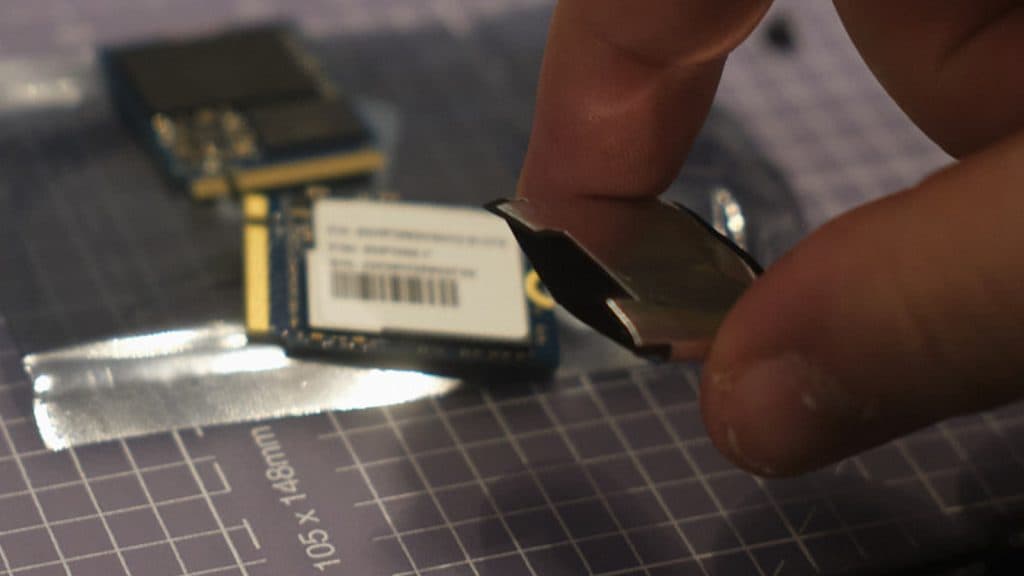
Replacing the NVMe drive

In a wrapper, you’ll see the 2230 drive. Remove the screw and set it aside, carefully pulling out the drive by lifting gently and pulling it out from its socket.
Remove the wrapper from around the 2230 SSD and place it onto your new drive. Slot the new drive in and screw it down to keep it in place. This is essential to keeping your drive cool while in use.
Reassemble the Steam Deck
Now reverse everything you’ve done. It’s been super stressful, but you’ve made it. Don’t forget to reconnect the battery. Place the metal plate and snap the back of the Steam Deck into place. We can now move on to the software side of things.
Flash a USB stick with SteamOS
This can be done on either Linux, macOS, or Windows. We recommend using Etcher for this, as it’s super simple. Once you’ve downloaded Etcher, download the correct SteamOS file.
Follow the instructions on Etcher, choosing the file and the correct drive. If you’ve formatted the drive beforehand, and given it a name, Etcher bypasses this. Just know which brand of USB stick you have and you should be fine.
Once Etcher is finished, pull the USB stick and slot it into your Steam Deck’s USB-C hub. If you have the official Dock or the JSAUX one, these will be fine. If not, make sure to grab one with power passthrough, as you don’t want the Deck to run out of battery halfway through.
How to load the Steam Deck bootloader

With the device completely off, press and hold the volume down button and then press power. Once you hear the chime, let go of the volume down button and wait a few seconds. On your first attempt, it could take a little while longer than normal.
Reinstalling SteamOS on the new Steam Deck SSD drive
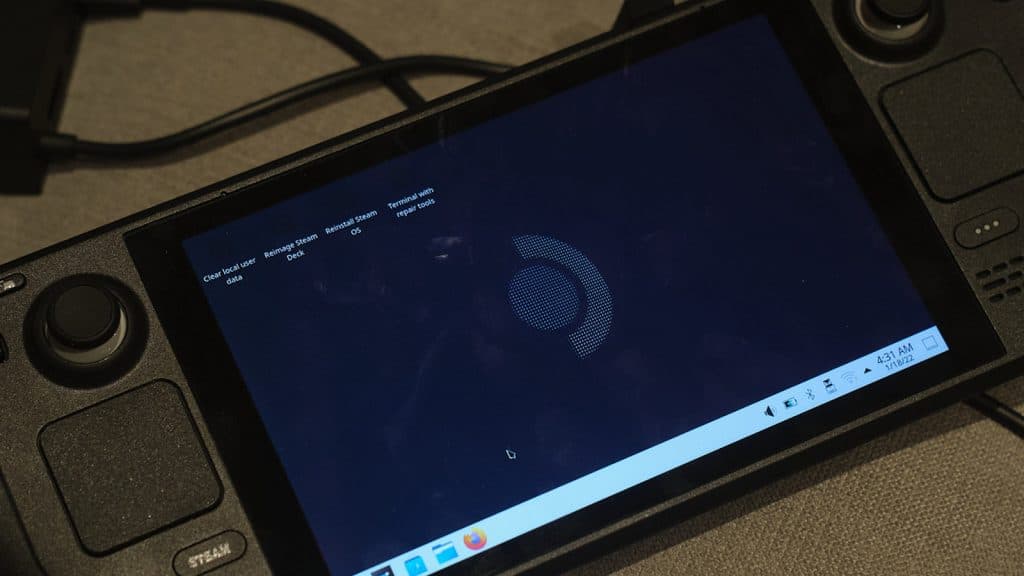
With the USB-C hub connected, it should now show you the USB drive we’ve just flashed. Use the d-pad and face buttons to navigate the menu and you should then be booted into the LiveUSB version of SteamOS.
There are going to be a few options at the top. We need to choose Reimage SteamOS. The others are what you’d choose if you wanted to sell the Deck, or recover data.
Once you click that, it’ll begin the reinstallation process. Follow any instructions that pop up and you’ll be ready to move on.
This can take up to about an hour, so set aside some time. Once the Deck has fully installed SteamOS and all the updates are done, you’ll be able to log back in and reap the rewards.
How to clone the Steam Deck SSD: Alternative method
Cloning your SSD is a simple task, but it’s also a convoluted method if you don’t already have the necessary equipment. For this method, rather than flashing the SteamOS image via USB, and losing everything, you simply transplant the data from one SSD to another.
Cloning a drive is probably the best option for those without decent internet, who don’t want to go through the hassle of downloading games all over again, or going through the setup process.
Depending on how much you’ve gotten installed on your Steam Deck, this could take the same amount of time as a fresh install.
There are a few ways to do this, but we can actually do it via the Steam Deck itself. We recommend grabbing a USB-C dock or hub and connecting a keyboard and mouse for the following. You don’t need it hooked up to a TV or monitor.
We need the hub in case the power suddenly goes out on your Steam Deck and the various issues that can follow from a bad clone.
You’ll also need an NVMe enclosure that supports 2230 drives. We’ll be plugging in the fresh drive into this, and then replacing the SSD as detailed above.
Cloning your SSD on SteamOS
Head into your Steam Deck’s desktop mode by hitting Steam, going down to Power, and selecting Desktop mode.
Once there, load up Konsole, the terminal for SteamOS. If you haven’t already set up a Sudo password for your Steam Deck, follow this guide.
After setting up your password, or if you already have one set, type in:
sudo lsblk
This command lists all of your drives currently connected to Linux. We’re going to want to take note of the NVMe drive currently connected internally. Once you know the name, plug in your NVMe enclosure to the Dock.
Head back to Konsole and type the following in, putting the noted NVMe name where applicable:
sudo dd if=/dev/[drive name here] of=/dev/sda oflag=sync bs=128M status=progress
Don’t close Konsole until the transfer has finished. After this, head back up and read about how to replace the SSD in your Steam Deck.
–
What is the largest SSD you can put in a Steam Deck?
You can install up to 2TB inside a Steam Deck. This is due to the limitations of the 2230 NVMe that the Steam Deck requires. Framework and Western Digital currently sell the 2TB version in the Framework store.
What SSD is compatible with the Steam Deck?
Only the 2230 NVMe is compatible with the Steam Deck internally. Externally, you can add whatever kind of storage or SSD you like, as long as it’s formatted properly.
If you want to install Windows on this device, or dual-boot, you can absolutely do so, and here’s how to partition your drive.
Also, make sure to check out our other guides
Best power bank for steam deck | Steam Deck Vs Nintendo Switch | Can you play FFXIV on Steam Deck? | Can you play Tactics Ogre on Steam Deck? | How to set up EmuDeck on Steam Deck | Best microSD cards for Steam Deck | How to play Battle.net games on Steam Deck | How to install Epic & GOG games on Steam Deck
If you click on a product link on this page we may earn a small affiliate commission.