Armored Core 6 mid-game COAM farming guide: Best Mission, build, more
 FromSoftware/Bandai Namco
Armored Core 6 COAM farming quickly becomes a necessity around the mid-game. The powerful weapons and parts that become available have a hefty price tag. Here’s a quick mid-game COAM farming guide to keep you stocked up.
Armored Core 6’s mid-game is when the options for customizing your mechanical death dealer really open up. If you want your Armored Core (AC) to have all the best bits, you need one thing: COAM.
COAM is Armored Core 6’s primary resource and you’ll use it to purchase weapons and parts to build your beastly AC. Having access to a lot of parts makes it easy to switch up your build as you encounter the game’s tough bosses, including the one in this guide.
We’ve already put together a guide for farming COAM in Armored Core 6’s early game but if you’re a bit further along, you’ll want to check this one out. Below we’ll fill you in on which mission to replay, what build to use, and the best strategy for maximum profit.
 FromSoftware/Bandai Namco
Armored Core 6 COAM farming: Best mid-game mission
The best mission to farm COAM in Armored Core 6’s mid-game is ‘Destroy the Special Forces Craft’. It becomes available in the third chapter of the game but be warned, it is a Decision Mission and contributes to the ‘Bad Ending’.
For a first playthrough that shouldn’t be a concern as most players will want to experience all three endings. It’s quick to finish and has a fantastic max reward of 300,000 COAM though not incurring any repair or ammo costs is pretty much impossible unless you’re a gaming god.
The mission has you face off against the imposing tank-looking MT from the story trailer for Armored Core 6. That’s right, not only do you get a metric tonne of COAM, you also get to avenge your fallen comrades 617 and 619.
So, what’s the best way to tackle an insanely quick and highly lethal robot tank that made mince meat of two experienced AC Pilots?
Armored Core 6 COAM farming: Best mid-game build
At this point in the game, you’ve probably realized that throwing around terms like “best build” is a little hyperbolic (unless you’re talking about dual shotguns). In this instance though, the weapons used for this build are very effective against the Special Forces Craft.
You’ve probably gotten used to a specific leg type and the movement that comes with it, this is just one build we’ve found that works to quickly dispatch the target. The mobility offered also helps avoid damage and get a higher take of COAM.
 FromSoftware/Bandai Namco
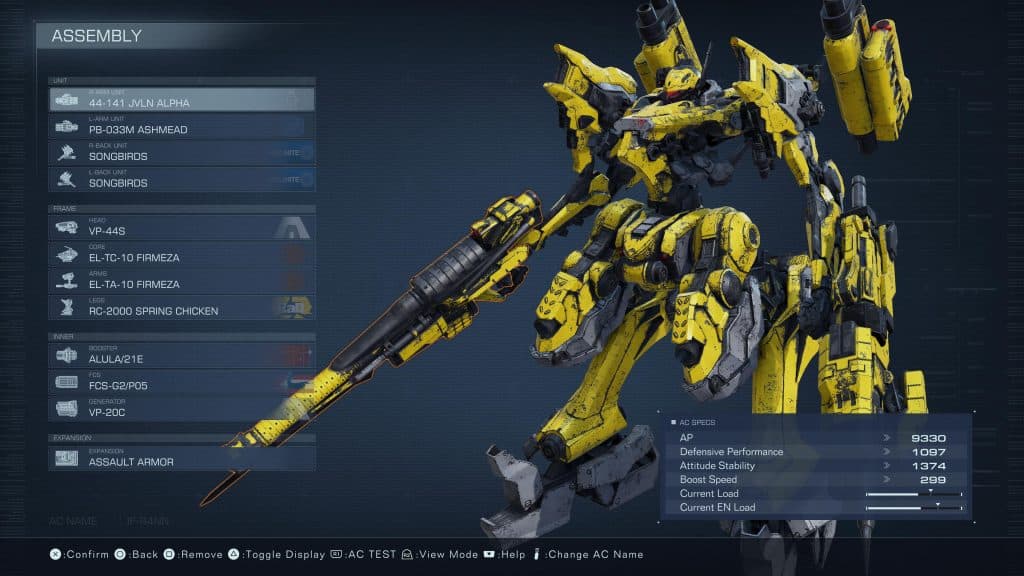
The build is made up entirely of parts you should have access to when the mission first becomes available and is as follows:
Weapons
- Right Hand: 44-141 JVLN ALPHA (Bazooka)
- Left Hand: PB-033M ASHMEAD (Pile Bunker)
- Right Shoulder: SONGBIRDS ( Grenade Cannon)
- Left Shoulder: SONGBIRDS ( Grenade Cannon)
Frame
- Head: VP-44S
- Core: EL-TC-10 FIRMEZA
- Arms: EL-TA-10 FIRMEZA
- Legs: RC-2000 SPRING CHICKEN
Inner
- Booster: ALULA/21E
- FCS: FCS-G2/P05
- Generator: VP-20C
Expansion
- Assault Armor
So, how do you employ the awesome firepower, swift mobility, and fantastic energy management that this build gives you access to?
Armored Core 6 mid-game COAM farming strategy
The strategy for this particular build is relatively simple: Use the high impact afforded by the SONGBIRDS to instantly stagger the Special Forces Craft, dash in with a charged Pile Bunker attack, and finish with a Bazooka shot. Rinse and repeat.
Now, the Special Forces Craft is heavily mobile and heavily armored so only hits to the vulnerable humanoid-looking center will have any effect. The only way to hit it is head-on so you’ll have to bait it into a charge.
Once you get your guaranteed stagger by firing both SONGBIRDS at once, the Pile Bunker’s high crit damage and the melee specialization from the arms will do the bulk of the damage. Finish the combo by firing a shot from the bazooka and quickly dash to the right to avoid the charge that usually follows a stagger.
The high mobility afforded by reverse joint legs and the Quick Boost speed from the equipped booster should help you avoid major damage. Just make sure to be at mid-range or further to avoid its mounted laser shotgun. Below is a quick video of a decent run that should illustrate the strategy properly.
And there you have it, an efficient and easy way to keep your pockets full as you tackle the mid-game. This COAM farm for Armored Core 6 should ensure you have access to the best parts for your playstyle and allow you to experiment with new ones.
If you’re after more info on how to maximize your performance in Armored Core 6, check out Dexerto’s other guides for the game.
Is the Moonlight Greatsword in Armored Core 6? | Armored Core 6 PC requirements | Is Armored Core 6 open world? | Does Armored Core 6 have multiplayer? | Armored Core 6 pre-order bonus & edition differences | Is Armored Core 6 coming to Xbox Game Pass? | How to Stagger enemies with Impact meter | Does Armored Core 6 have photo mode?