How to set up a Jellyfin server: OMV6, Docker & access anywhere
Jellyfin is a free alternative to Plex, bringing your home entertainment into your control. Here’s how to set it up.
Streaming content online is getting more and more difficult each year, with so many services on offer, and so many fees to pay. Amazon recently announced that it’d be inserting adverts into those paying for its Prime subscription. The only way around it is to pay an additional $3. Netflix also raised its prices again in 2023. Those who got Paramount+ through their Walmart+ subscription, can’t upgrade to include Showtime in their package.
At some point, it gets too much. At some point you have to say is it all worth it? Enter Jellyfin, an open source solution to streaming your own personal collection of content anywhere. It can be difficult to set up initially, but we’re here to walk you through the entire process.
Here’s how to set up a Jellyfin server, so you can stream your owned content anywhere, with no fees required.
Contents
- What is Jellyfin?
- Hardware
- Software
- How to install OpenMediaVault
- How to install Docker
- Jellyfin setup
- Access Jellyfin anywhere
What is Jellyfin?
Jellyfin is an open-source media server. It’s fairly resource-light and is super easy to install on a massive range of devices. You don’t even need to use a dedicated device, as there are Windows and macOS apps that will run as and when.
Jellyfin can be a go-to setup for your home, and there’s not one single setup that rules above all, with a flexible range of hardware compatible with the server. It really is whatever you make it.
Is Jellyfin worth it?
In the long run, Jellyfin will probably save you money if you begin to unsubscribe from unnecessary services. It can also be as cheap or as expensive as you want to make it.
Jellyfin can be used to take rips easy or harder-to-find shows, which are available on Blu-Ray or DVD, and with your rips, turn them into streamable shows, which offer an ad-free experience, which is much better than suffering through watching the same ads over and over again.
Sure, you could use a VPN to watch shows not available in your region, but the streaming quality or rip quality of the show itself might be compromised. Jellyfin offers a simple way around this, as long as you set it all up correctly.
Jellyfin & self-hosting will save you money
Netflix and other streaming services are constantly rising in price, and with so many on offer, the fees could rack up into the thousands as you subscribe to them all for five years and upward. By contrast, you can set up a very capable Jellyfin server for around $500, which includes a PC, storage, and other nice-to-have extras.
Just remember, you’ll need digital files of whatever content you want on your server, so get ripping those Blu-Rays and dusty DVDs.
4K movies on Jellyfin
If you want a 4K media server, you’re going to need powerful hardware to stream and encode streams smoothly. While some modern iGPUs – like in the latest Intel chips – will be able to handle 4K streaming, we would recommend a dedicated GPU. The more money you put into your server, the more you’re going to get out of it.
But, if you’re only looking to play directly with no access anywhere, and don’t have huge filesize to contend with, you won’t need a dedicated GPU or stronger iGPU.
Jellyfin will also transcode your 4K media into 1080p to be played more easily over a network. In this case, you’ll need something a little beefier. This is converting the file down to a smaller size, and to do it quickly and on the fly, will require speedy hardware.
Or, you could just opt to be content with a 1080p server, which will be able to be transcoded on pretty much any PC at this point.
Hardware needed for a Jellyfin server
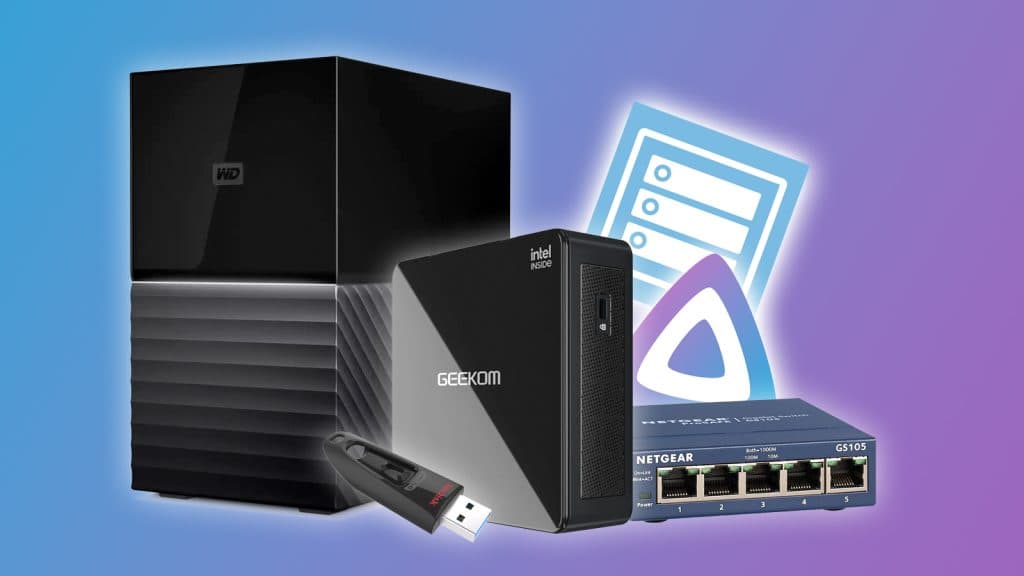
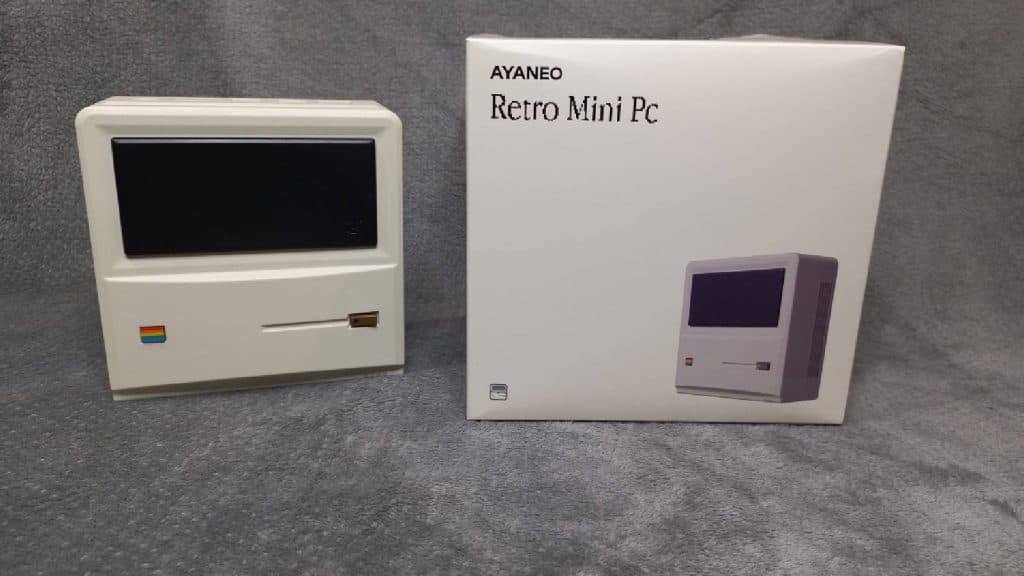
If you want a dedicated server that you set and forget, then you’ll need a spare laptop or PC. For this use-case, smaller mini PCs, like Geekom’s MiniAir 11 perfectly fit the bill, especially if you’re just looking for lower-res streams.
Geekom MiniAir 11 specs
- Processor: Intel Celeron N5095
- RAM: 8GB DDR4
- Storage: 265GB NVMe SSD
We’ve recommended the Mini Air 12 over the 11, as it’s currently cheaper than the older generation model.
Its specs are not great, but it’s suitable for delivering content over the network in a timely fashion. It’s also being put to use as a file and web server. This is all done through Open Media Vault and Docker, which we’ll explain later.
Recommended mini PCs & hardware for Jellyfin
You can use pretty much anything, for a Jellyfin server, but it is not recommended for some configurations. For instance, while you can use a Raspberry Pi for hosting your server, it’ll be a little lackluster. You also can’t use the new Raspberry Pi 5 due to a hardware limitation.
AMD CPUs that end with a G prior to the 7000 series will not need a GPU. Meanwhile, some AMD and Nvidia GPUs like the RX 6400 and Nvidia’s GT 1030 don’t have encoding hardware. It’s best to avoid super low-end components. If you’re not going the mini PC route.
In any case, it’s best to play it safe and stick with Intel for now. Just be warned that any Intel chip with an F after its name won’t have an integrated GPU either.
Our recommended mini PCs are below:
| Mini PC & Processor | Where to buy |
|---|---|
| GEEKOM Mini PC Mini Air12 (12th Gen Intel N100) | Get from Amazon |
| Ayaneo Mini PC (AMD Ryzen 7 5700U) | Available via Inidiegogo |
| Beelink S12 Pro Mini PC (12th Gen Intel N100) | Get from Amazon |
| Beelink Mini PC (AMD Ryzen 7 5700U) | Get from Amazon |
Streaming devices
You’re also going to want to pick up a streaming device that supports Jellyfin. An Amazon Fire Stick, Roku device, or any other box will do just fine. In our setup, we also needed to pick up a network switch to increase available ports. There’s no supported app on Xbox and PlayStation.
If you’re on an LG TV or Android-based TV, the app should be readily available for you to download and use.
However, on Samsung Tizen TVs, the app is built and maintained by the community instead. It’s also not available directly and requires additional work.
Storage
You’ll also need something that’s not an SSD. While a decent solution and probably faster media loading, SSDs don’t often have great sustained read speeds in some cases, especially for DRAM-less configurations. We’re using a 5TB RAID setup through a basic Western Digital 10TB hard disk drive (HDD) storage option. It means that we won’t lose all our data, and they’re optimized for network access.
We’re simply recommending HDD over SSD due to the price. While the dollar per GB is coming way down on SSD storage, it’s still significantly more expensive for little benefit. Unless you want total overkill, large HDD storage will almost always provide a great experience.
It’s recommended you go for something like the Western Digital Red drives. These are designed with long, sustained use in mind, and won’t break down as easily.
As we’ll be using Balan Etcher to write our new operating system to a USB stick for installation, we also want to get hold of an 8GB USB Stick (at the very least).
Network switch
If you have your router near your planned server, you can use a network switch to split out your connection. This will save you a port, but also add a few onto your network. If you’re using a powerline adapter, this should work too.
We don’t recommend using Wi-Fi, it’s not worth it. Connecting to the server via Wi-Fi is fine, but streaming out over it? Not a good idea.
Software needed to run Jellyfin
The hardware isn’t even the scary bit of this. It’s the software you’re going to learn about that can turn some people off. If you’re running a direct service, with no networking involved outside of your standard Internet connection, you can skip ahead now.
You’re going to need two pieces of software. For a new operating system, we’re going to use Open Media Vault and Docker.
What is OpenMediaVault?
Open Media Vault (OMV) is a spinoff, or fork, of Debian Linux. Its intended purpose is to turn any system it’s installed on into a NAS. It also features the ability to run software services through things like Docker.
It also runs “headless”. This means you won’t actually interact with the PC directly once it is installed. You’ll need to connect over its IP address through a browser to access its many options.
What is Docker?
Docker is a piece of software that helps compartmentalize software under one roof. It does this through “containers”. Rather than natively installing it on your system as an app, it instead has it run effectively in the background. You then access each “container” via your IP address and port number in a browser.
Docker Compose
Docker Compose utilizes the YAML file structure to feed instructions on what to install via Docker. It does all the setup for you, and then you can dive in for configuration. With Open Media Vault 6, this has become a little bit of a chore to install.
How to install OpenMediaVault
- Download Balena Etcher on your PC or laptop
- Grab the OpenMediaVault ISO from their site
- Plug in your USB stick and open Etcher
- Select the ISO and choose your USB stick
- Let it write to the device and then safely unplug your USB stick
Boot via USB
Now head over to your device of choice, and plug in the USB stick. If you went with an old Windows PC or even the above recommendation, all you need to do now is boot into your BIOS and reorganize your boot list.
- Connect a keyboard to your device and get to your BIOS.
- Using the keyboard, navigate over to the boot priority list
- Swap your USB stick to the top of the list and reboot
- OpenMediaVault will now begin installing
When you’re prompted with a device to choose to install, make sure to choose your chosen drive. Of course, I went with the already installed SSD.
Follow the onscreen instructions and eventually, you’ll be met with a black screen that displays a command line asking for a login. Use ‘root’ as your username and then the password you just set during the install process. Once you’ve done that, the code ‘ip addr’ will give you your IP address.
It should be next to the networking device you set up during the installation. Mine looked like this: 192.168.X.XX. Yours could start with a 10.
This is when Open Media Vault becomes “headless” and we can go to another device.
Open a browser, navigate to the IP address, and log in with the password you set up. The username should be admin.
This will then send you to the “Workbench”, which is the brains of the operation. It gives you a total rundown of what’s being used, the system resources, and more. You can customize this in the settings, but for now, let’s get Jellyfin installed.
Install Docker on OpenMediaVault 6
Before we install Jellyfin, we’re going to install Docker. Now, the issue is that OpenMediaVault changed how this works from prior versions, and it adds a couple of extra steps. Instead of just being actively available, OMV has hidden some extras from fresh installs.
Using another PC or Mac, head over to your terminal or command prompt. We’ll need to use SSH to tunnel into the server and then install what’s needed.
To SSH into your device, type the following:
- Open Terminal or Command Prompt
- Type: ssh root@[your server ip]
- Type your password
It’ll warn you if you trust it, but just agree and we can get Docker going.
After you’re logged in, you’ll then want to use this script from OMV-Extras.org:
wget -O – https://github.com/OpenMediaVault-Plugin-Developers/packages/raw/master/install | bash
This will then allow us to add more extras to the OpenMediaVault, including things like file browsers, and more importantly, Docker and Docker Compose.
Install Docker via OMV Extras
Now we’ve added the repo to our server, you can now navigate to ‘omv-extras’. Check the box for the Docker repo. Press save. After it’s done, refresh your page for safekeeping and then head back to the sidebar. You’ll now have all the extras in your plugin menu.
Install Docker Compose on OMV6
Head to plugins, and then we can search for “compose”. Install this and we’re off to the races.
While you’re here, I’d recommend installing the file browser. This will make things easier for uploading files to your server in the future from any device on your network.
Running Docker
Now you have all the parts, we need to get Docker to run. This requires setting up a shared folder via one of your connected drives. While it’s not recommended to install it on your main drive, we were a little naughty and did it anyway.
We’ve had no problems in two months, but you might want to keep it separated from your main installation drive.
If you check on your Docker Compose settings, you’ll find that it’s probably not running Docker. To fix this, click the small plus at the top and choose an attached drive to dump your Docker files.
Alternatively, you can do this via Storage > Shared Folders > Create (plus button) > Choose a drive.
Browse the directory until you find a spot to place it into.
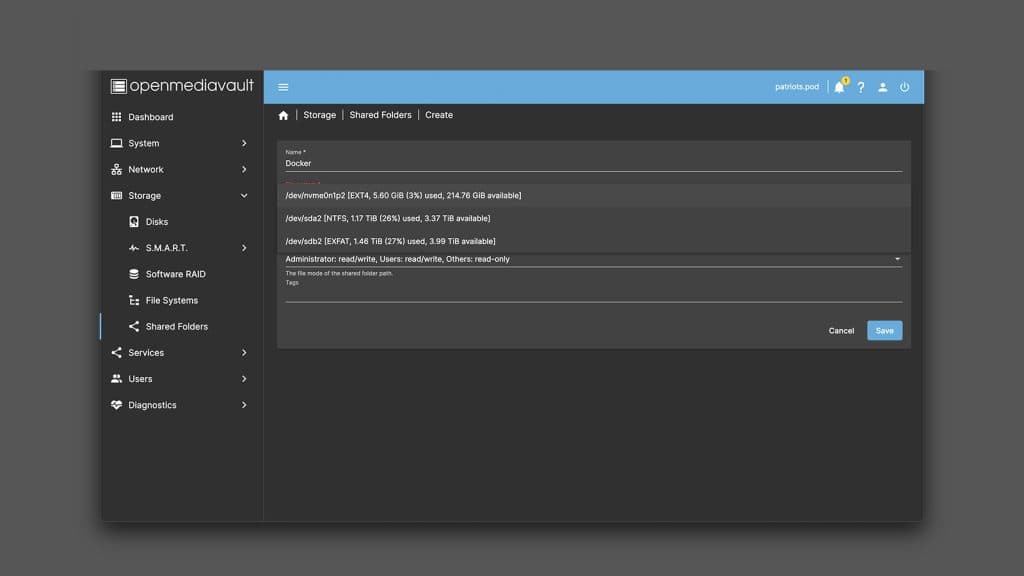
If this is a new drive, check EXT4 as your file system. This is the most common option on Linux. You cannot partition these drives, as OMV, much like other Linux-based OS, will need the entire drive.
You’ll now see it sorting out your newly chosen folder in green text and then will write END OF LINE. You can then move on to the next part.
If a yellow box appears asking you to confirm things, be sure to click it. This will act as your “apply” button like on Windows.
Head back into Compose, choose your newly shared drive, and press Save. Then hit “reinstall Docker” to initialize the software. After it’s done installing, be sure to refresh the page or it’ll look like you’ve not installed it.
Setup drive ready for Jellyfin
If you’re using a RAID or large storage device, make sure it’s shared with the rest of your server. Using the same method above, set up your storage device where your media is going to live. This will also give Jellyfin access to install its default file path.
Install Jellyfin via Docker on OpenMediaVault 6
With everything installed, you can install Jellyfin. SSH back into your device and use the following from Dockerhub by pasting the following into your terminal:
docker pull linuxserver/jellyfin
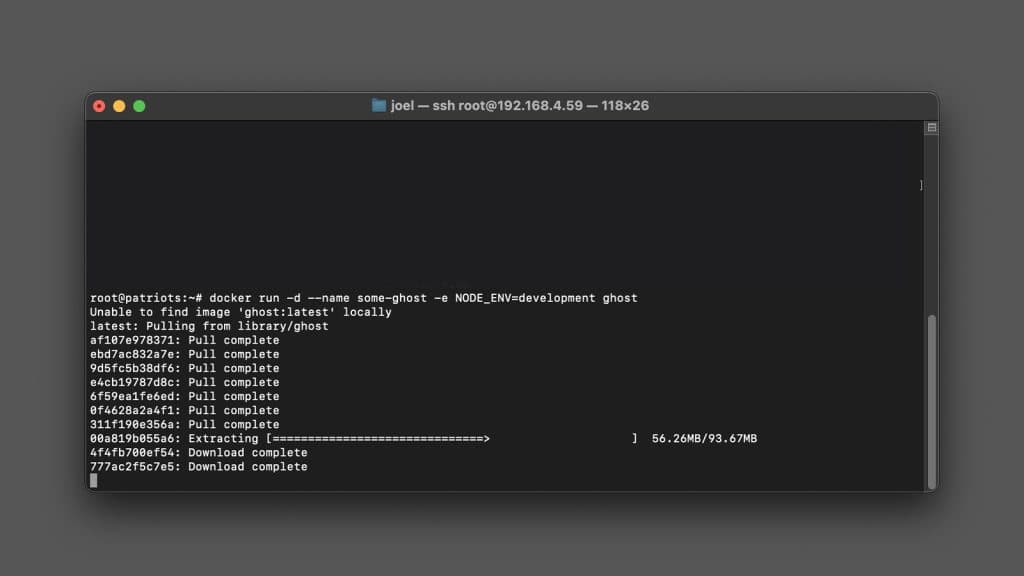 This is pulling in a different app as an example, yours will say something about Jellyfin.
This will utilize Docker and Compose to install Jellyfin. Once you’re done, you can even go see it living in its new container by going through to Compose > Containers.
That’s the major hassle taken care of, Jellyfin is now installed and waiting for your media.
To access Jellyfin, you want to head to your server’s IP address and then add the port number at the end. Jellyfin defaults to 8096. It’ll look like this in your URL bar:
192.168.x.xx:8096 or 10.x.x.x:8096
Install Jellyfin via Docker Compose
If you want to edit where this is going or if you already have media folders set up, then we can alter this by using the Compose method. This means during setup, we’ll need to alter the script.
You will need to set up your media folders as shared on the network through the same method as above. Once you’ve done this, you can then go to Shared Folders under Storage. Next to the list of created directories, you can see their URL. You can simply copy-paste this into the Docker Compose file.
Grab it from the same website we got the terminal code from. It’s further down the page and will look like this:

To install this way, head to Compose > Files > Create (plus)
After you’ve pasted it in we need to tell it where to install. By default, Jellyfin will create file paths in an ‘appdata’ folder. This will force this off, and instead send it to where you want. However, we do want it to point at the existing folders so you’ll need to change the following:
volumes:
– /path/to/library:/config
– /path/to/tvseries:/data/tvshows
– /path/to/movies:/data/movies
This should now be the very long string you’ve copied from the Shared Folders section and add onto it the following:
/srv/dev-disk-by-uuid-[stringofnumbers]/[SharedFolderName]/tv:/[FolderName]/[TV shows folder]
/srv/dev-disk-by-uuid-[stringofnumbers]/[SharedFolderName]/movies:/[FolderName]/[Movies folder]
We found it easier to simply copy-paste files into the newly created files set by Jellyfin.
Setting up Jellyfin
When you load Jellyfin for the first time, you’ll find it’s incredibly easy. Follow the instructions, set up a profile and password, then choose your folders. If you go for the default route, you’ll want to select them when prompted.
If everything went right with the above, you should also find that your chosen folders are also now available. This will immediately begin populating once you finish setup.
If you’ve media on your server already, you can now head to the three-lined menu in the top corner and choose Dashboard. The first button you’ll see is “Scan All Libraries”. Let it do its thing and your shows will begin to populate Jellyfin.
Adding media to Jellyfin
Remember the file browser we recommended you install? Open it up. By default it should be set to [your server IP]:3670.
As we’ve already set up our shared folder, all we need to do is head to the settings page under File Browser in the Services menu.
This File Browser plugin will let us simply navigate around our folders without having to deal with SMB or FTP. As we do most of our work on a Macbook over Wi-Fi, rather than connected over Ethernet, it’s still the same effective speed to upload it via SMB or FTP.
SMB & FTP
If you’re wired in, you might find it more beneficial to use SMB and FTP. To activate these, simply head to those settings under the Services options. Once you’ve activated SMB, it’ll be available over your network as a network device.
On macOS you’ll need to go to Finder and in the top bar, connect via the “Go” menu list and choose “connect to a sever”.
Once it’s set up, you can access it by adding your IP address as a network storage device. For FTP, you’ll need to grab it from the Plugins menu. You can access this easily via software like FileZilla, by tapping in your IP, port, and login information. This way you can simply drag-and-drop in the program.
Organization
Locate your Jellyfin appdata folder if you went by default, or locate your media folders. Simply drag and drop your video file into the correct place and Jellyfin will do all the work. You can separate these into their own folders, as once you start adding more things and artwork or subtitles are added too, it can begin to spiral out of control.
For TV shows, we recommend making individual folders for each show. No one wants over 100 episodes of Battlestar Galactica lingering in a folder with no organization.
We split them by show, then the sub-folders are done by season and then dumped in the right location.
Metadata
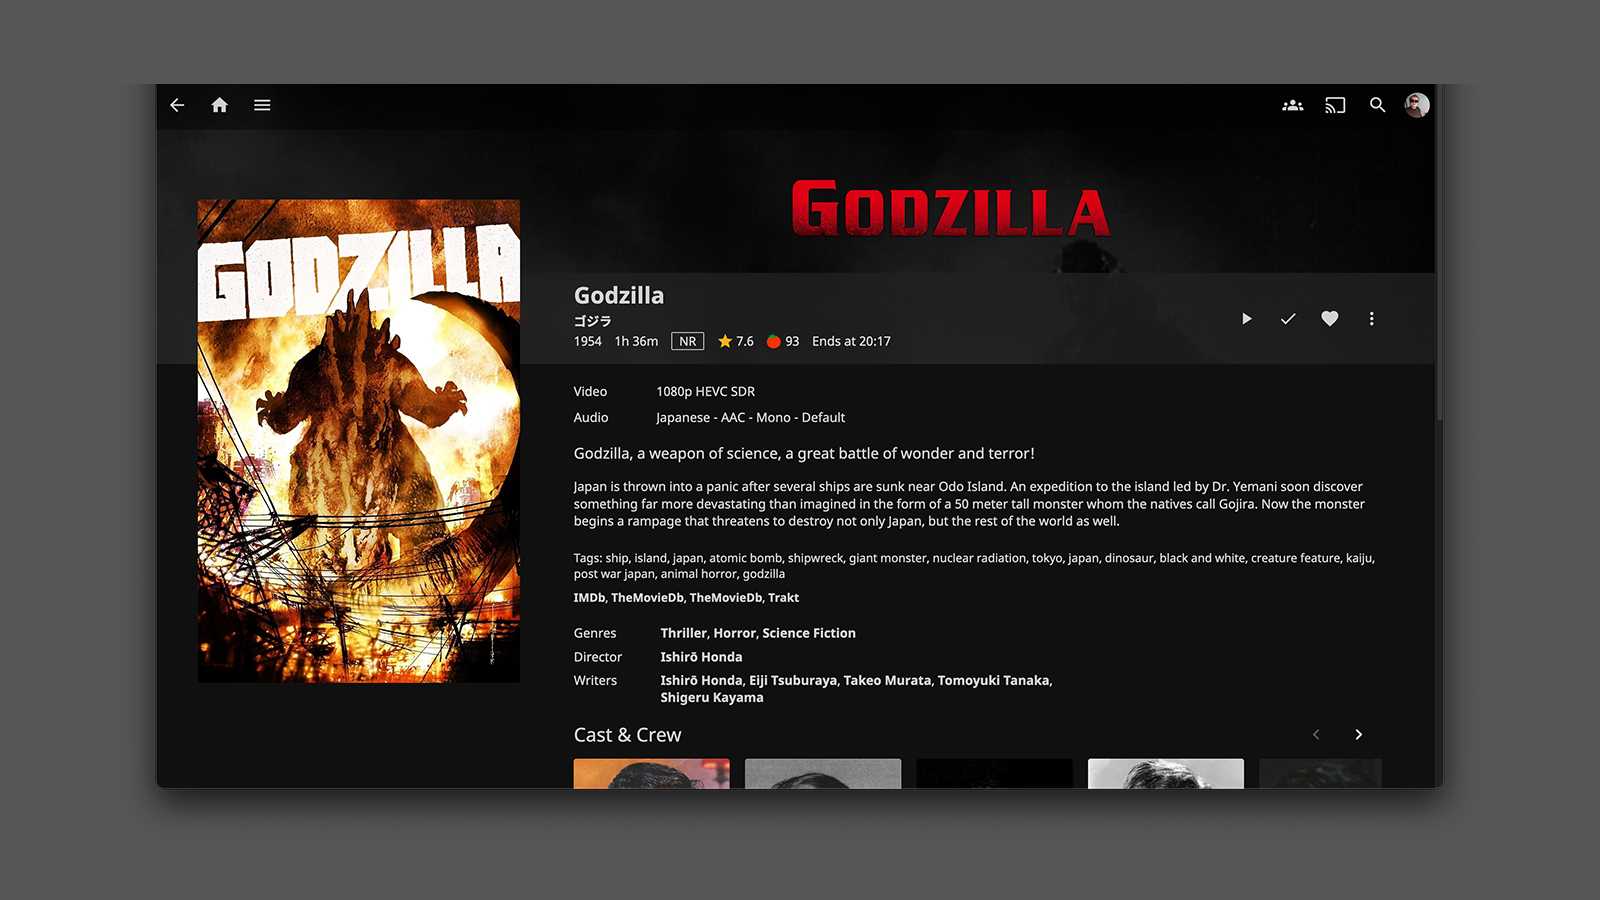
Quite often, Jellyfin won’t need any assistance with populating metadata. Popular and well-known movies are easy to look up. However, for something like the recent Metalocalypse movie, you may run into issues. For this, you can either add your own by editing the metadata, or if it’s still lost, it’ll offer a ‘Identify’ option.
You can also add the media manually, you’ll just need to follow the dimensions properly for each segment.
Subtitles
You can add subtitles to the same folder as your show or movie, but sometimes we’ve found Jellyfin adds them anyway. The main issue with subtitles on devices like a Roku stick is that they sometimes don’t appear. This is due to limited resources for anything but .srt files, as far as our testing goes. Time to pour one out for the .ass file format.
As long as you use .srt files, you’ll be just fine. You can acquire these from different sources. We use Subscene for several movies.
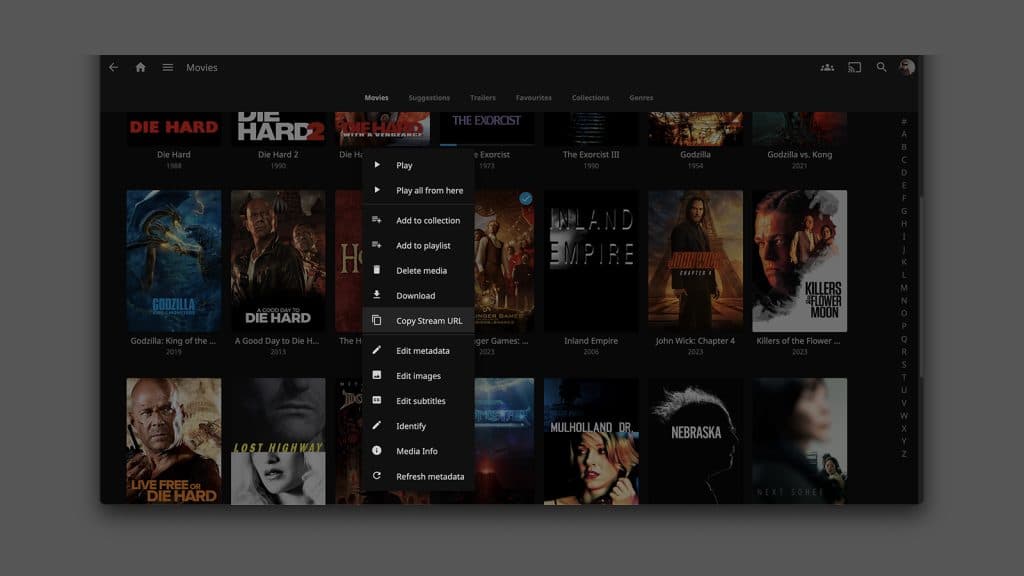
How to add subtitles to Jellyfin
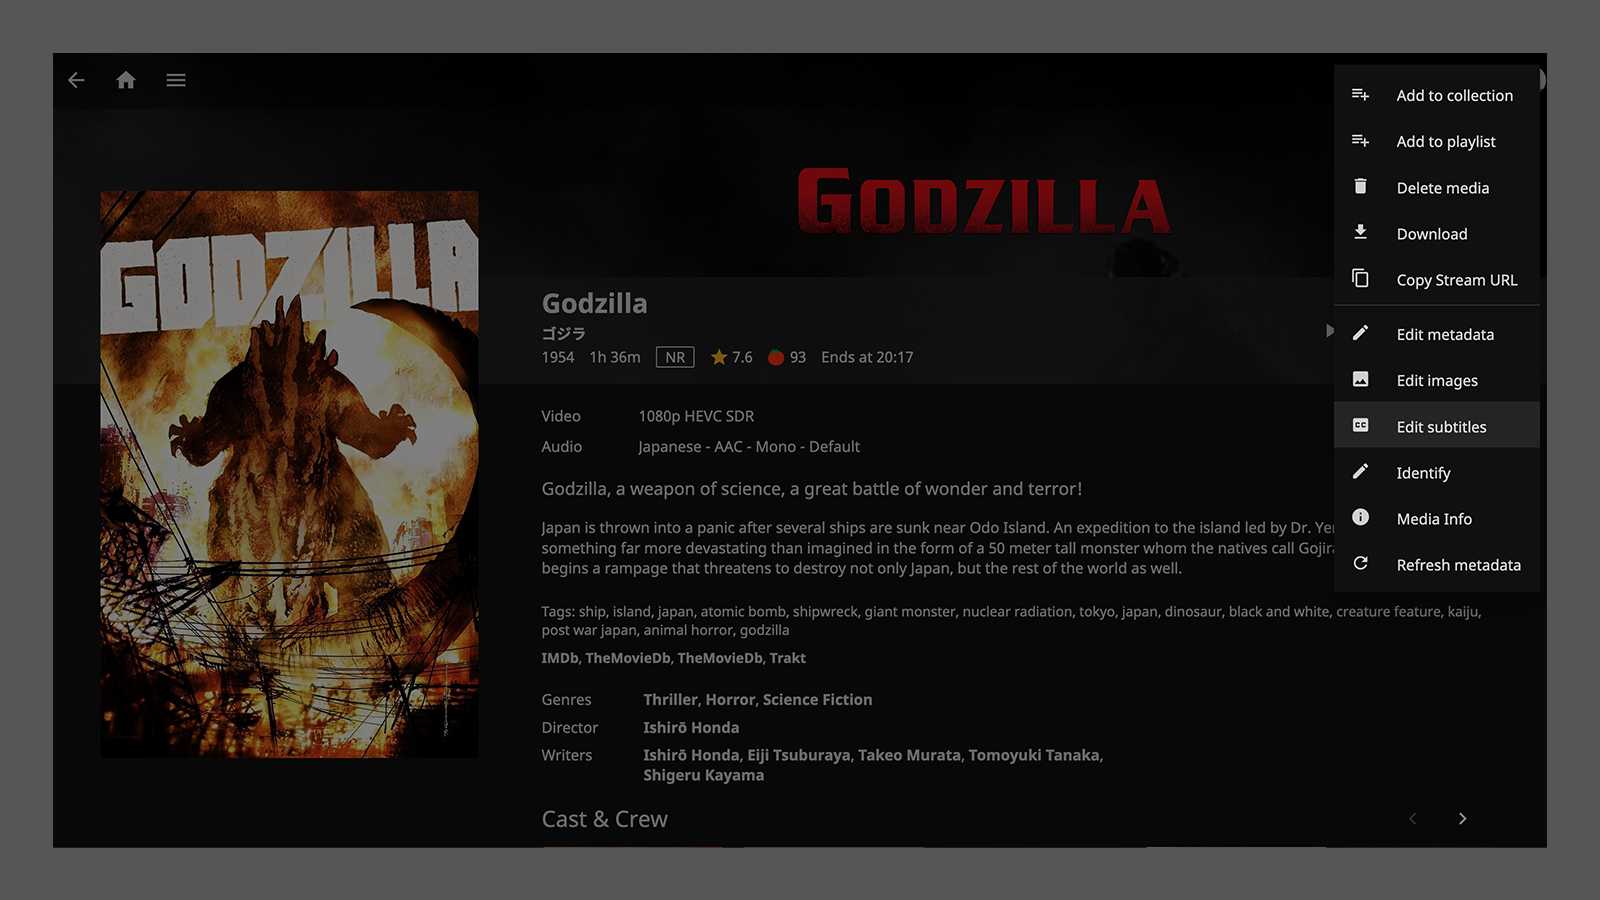
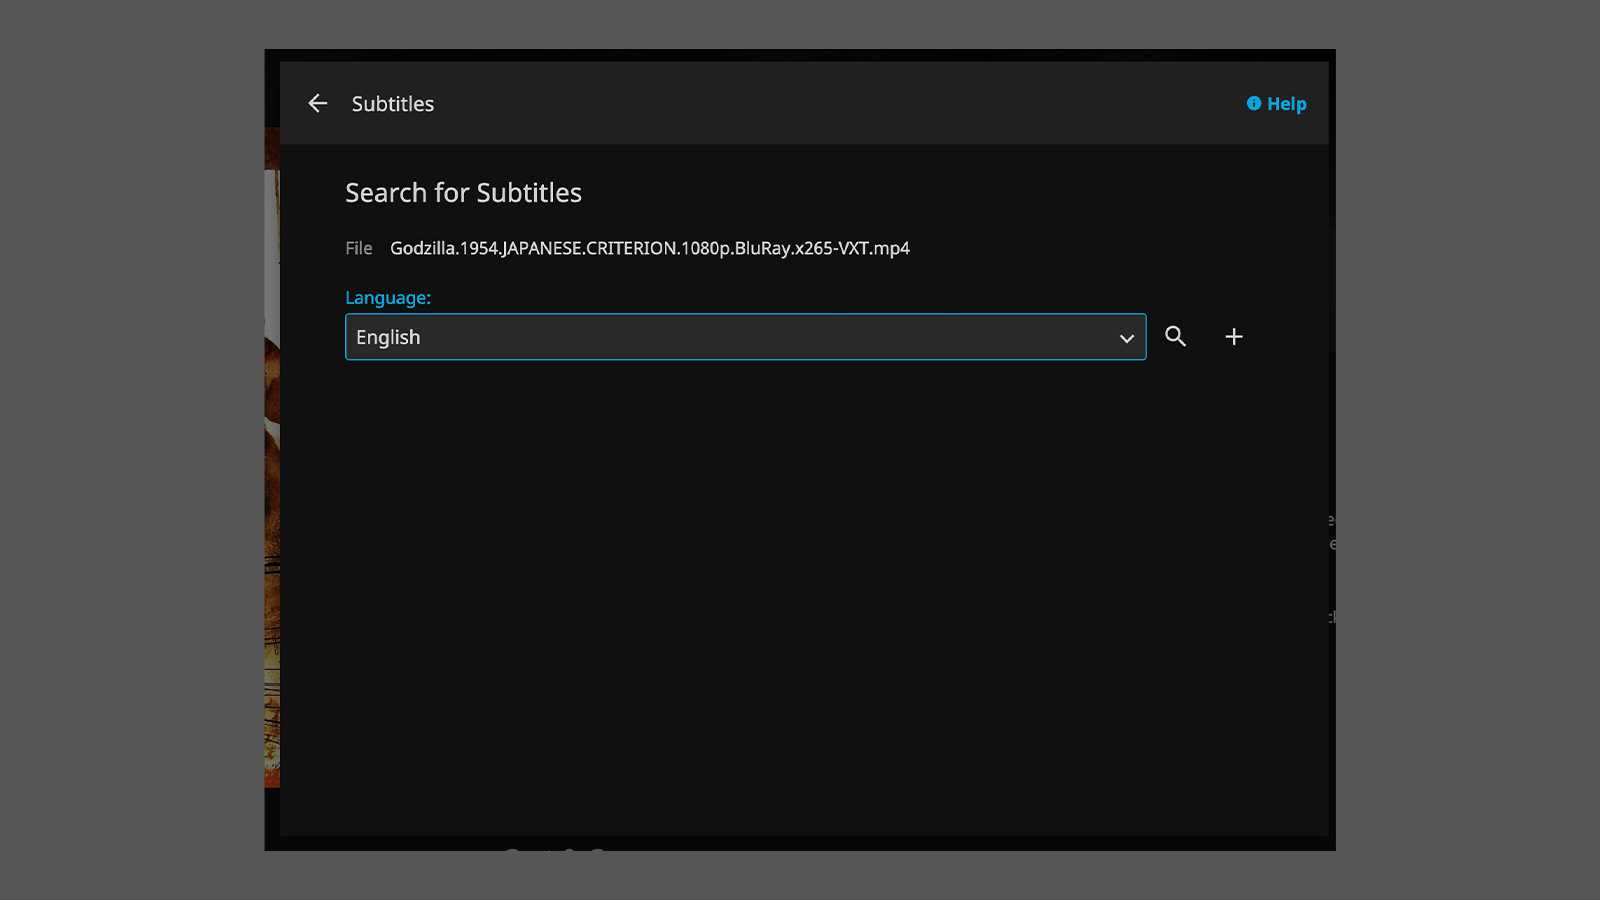
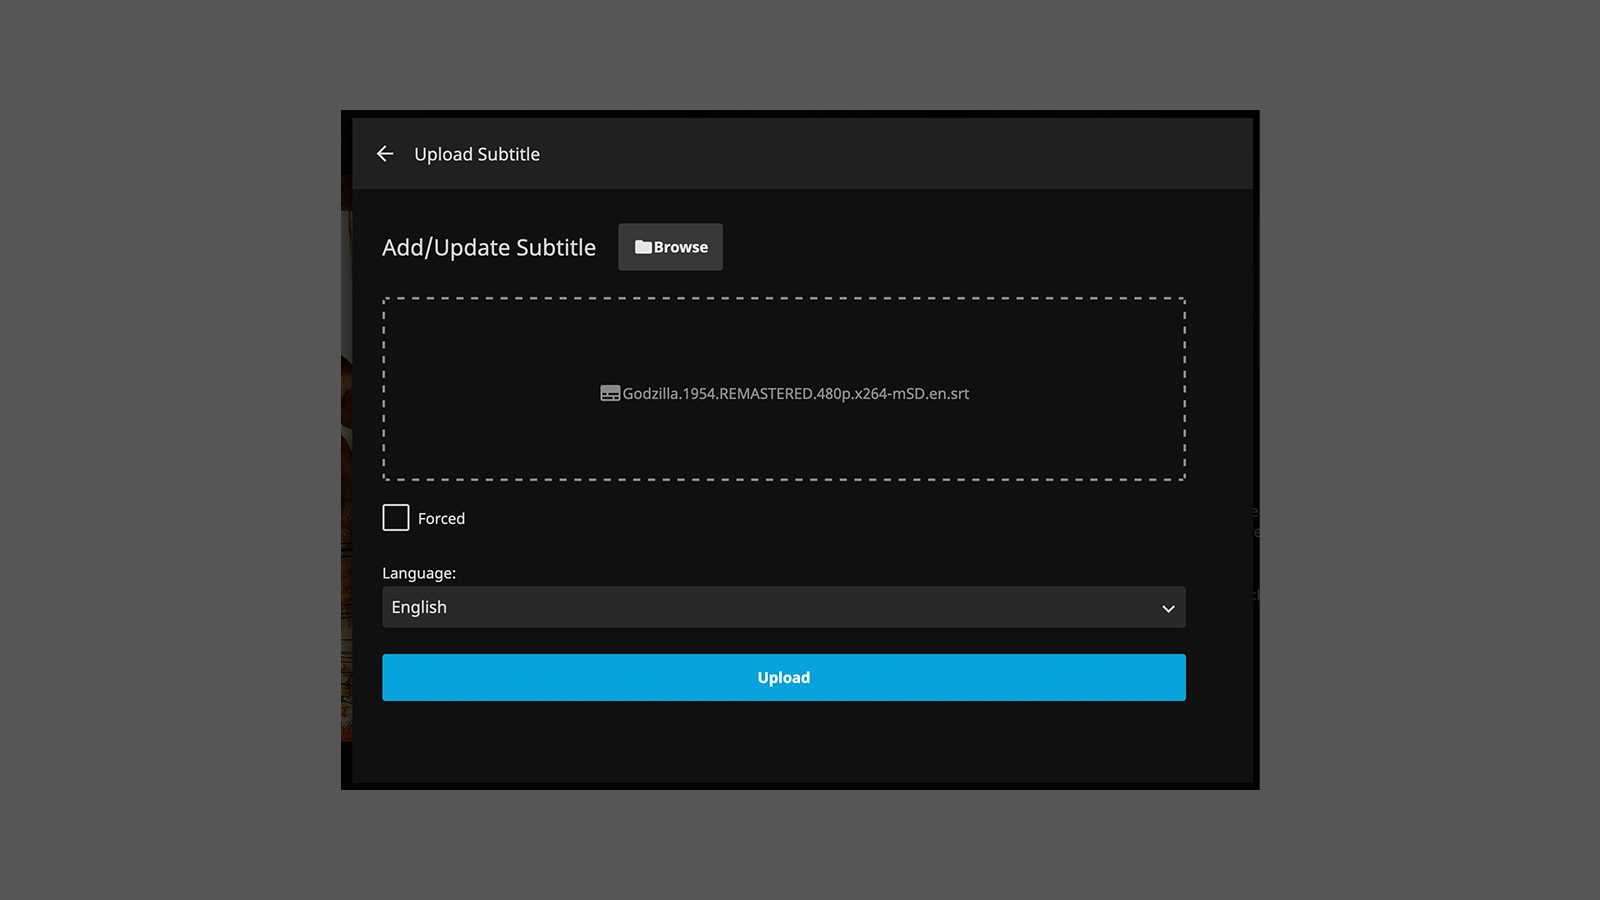
You can add subtitles by going to the movie, choosing the three-dot menu, and “Edit Subtitles”. This will bring up a menu to either search for them online or upload your own.
How to turn on subtitles on Roku Jellyfin
Press the OK button while the movie is playing and the options will be up in the top left. Navigate with the arrow keys and you’ll be able to choose the subtitle file.
Don’t add subtitles while the movie is playing. You’ll need to reload the app to turn them on.
Hardware acceleration
Hardware acceleration isn’t always necessary, especially if you’re using lower-quality 1080p files. The Geekom PC we used was more than capable of playing extensive movies without any acceleration.
For bigger video files and maybe even those wanting to transcode a 4K movie across the network, hardware acceleration will come in handy. Basically, anything post-2016 will be able to handle a variety of codecs. To use the new AV1 codec, you’ll need an RTX 40-series or other equivalent GPU to support it.
It’s also needed for HDR video, which it’ll then tone map out if going to an SDR endpoint.
To set it up head into the dashboard, and choose Playback. The first option will be transcoding. You can choose the best one for you – Nvidia, choose NVENC for instance – and move right along to select the formats you’ll be supporting transcoding for.
Configure any other options, save and it’ll be active.
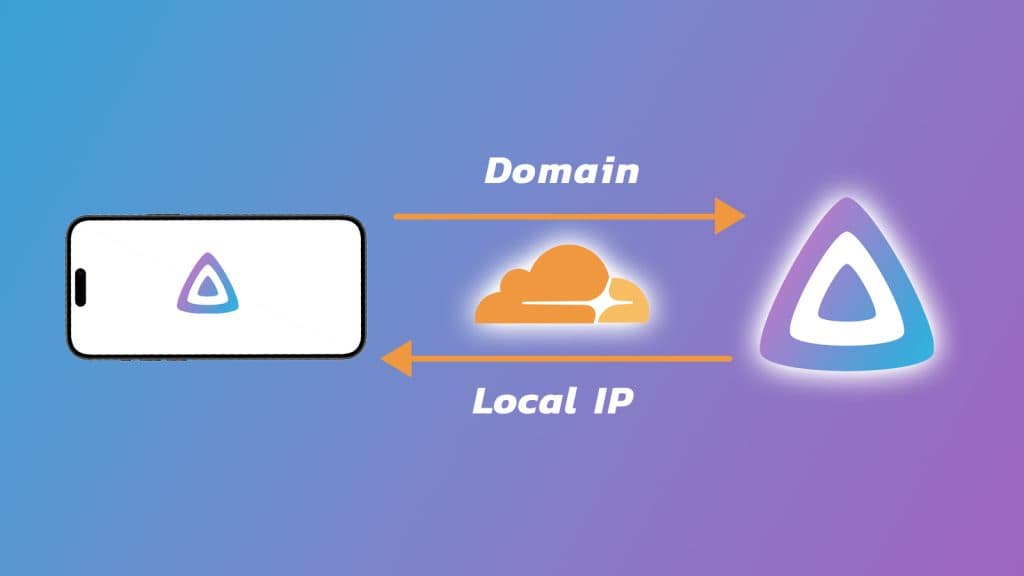
How to access Jellyfin from outside your home network
Here’s the complex bit. This will require you to own a domain. You can acquire free ones online from places like Freenom. We do recommend going with a paid provider, however.
Once you’ve acquired a domain, we also need to sign up for Cloudflare. Cloudflare provides a system called Tunnelling. This effectively bypasses any potential security flaws in things like port forwarding or reverse proxies. While both are perfectly fine, we’re not exactly running Netflix here. We just want to be able to watch Babylon 5 anywhere in the world, on command. That isn’t too much to ask, right?
Cloudflare
It’s going to look very scary, but whenever you see Cloudflare asking for cash, there’s probably also a free option. You’ll find them at the bottom of the page. This is for personal use, so it’s limited.
Follow any sign-up instructions, like inputting your domain and we can begin to move our nameservers over to Cloudflare.
Cloudflare’s onscreen instructions are very detailed, but if you’re struggling, it’s probably because you can’t find your nameservers. These will be at your domain registrar’s admin panel, and not on something like CPanel. We use a combination of registrars and each will have the nameservers usually under an information panel named something like DNS settings.
Once you’ve swapped the nameservers over to Cloudflare’s, it’ll take some time before it activates. In our case, it took five minutes, but the first time we did this, it took over a day before we got the ping that Cloudflare was ready. Be patient and come back to this once it’s ready.
Nameservers on old domains
If you’re using an old domain and the records are still there, it’s recommended you just wipe them. Cloudflare will let you do it from there, but we found that CPanel was hoarding them. It’s not necessary to wipe them, but it helps. We won’t need any records anyway, as this isn’t technically accessing the website normally.
Make a CloudFlare tunnel
Now we have everything set up, we can move to creating our first tunnel. You can access this through Zero Trust, but when we set this up the first time it wasn’t there. We had to go through the Access menu, which then said it was deprecated, which launched into Zero Trust from there.
Zero Trust will have you sign up as a “team”, and then you choose the free option. Once you’ve done that, follow any other instructions on screen and we can begin the process.
- In the Access menu, find Tunnels
- Choose Create Tunnel
- It’ll ask for a name, and then send you to the connector panel
- We’re going to choose Docker (but choose and follow instructions for any operating system you’re running Jellyfin through)
- Copy the script
- SSH back into your server via a terminal
- Run the script
- You’ll notice on the configuration page, that it’ll automatically refresh once it’s picked up a connection
- Type in your in-home IP to Jellyfin (this will be 192.168.x.xxx or similar)
- If you’re running it locally, just use localhost:8096
- Make sure to set it to HTTP or it’ll fail
- Don’t worry about this, Cloudflare will ensure things are protected
- If everything’s connected and working we can save the tunnel
Be sure to test the URL you set and viola! No complex reverse proxies or exposing your whole network online. Cloudflare should also keep you nice and protected. For additional protection, you can always go to your website’s settings on Cloudflare and add a layer of protection by toggling on SSL protections to Strict.
This is found under SSL/TLS settings and under Overview.
Cloudflare Tunnel disconnects when I close terminal or command prompt
Now the weird thing is that if we close those terminal windows, it’ll shut down our tunnel. We don’t want that.
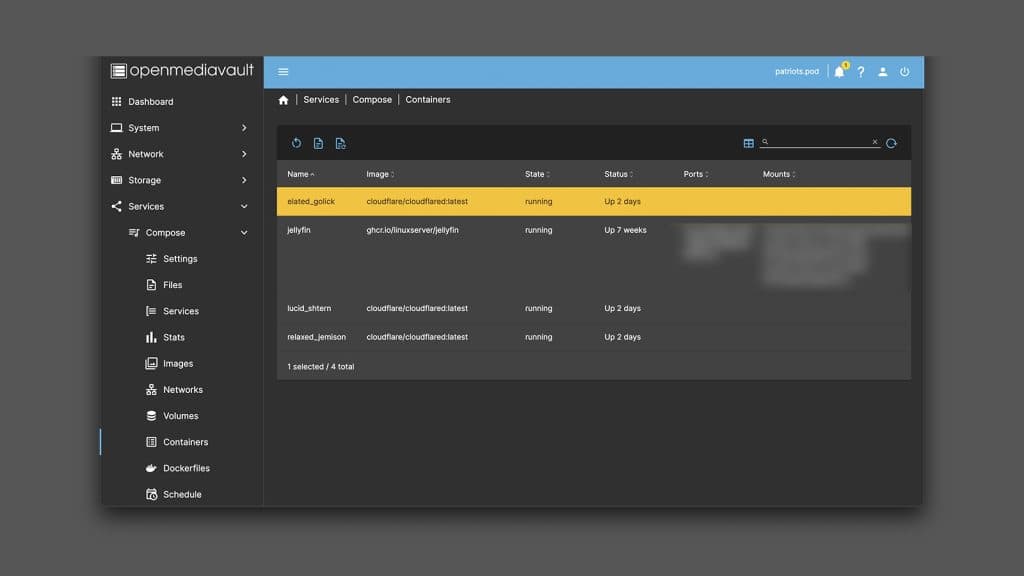
Head back to your OpenMediaVault or Docker container manager. In OMV you can do this through Compose > Containers. You’ll see a new container with Cloudflare all over it. It’ll probably be not running. Click it so it’s highlighted and then in the top bar hit ‘restart’. This will reboot it and restore your connection without having to have the terminals open all day.
That’s all there is to it. Have fun, watch a movie, and catch up on a weird show you haven’t been able to find on streaming services.
If you click on a product link on this page we may earn a small affiliate commission.